Getting started with Graph API for Intune

Microsoft Graph is a very powerful tool to access and interact with your data in your Microsoft cloud environment. For Azure Back To School, I will give you an introduction to using Graph API for Intune. We’ll first look at what Microsoft Graph is, we’ll talk you through how to set it up and we’ll look into some basic device management tasks using Graph API for your Intune environment.
What is Microsoft Graph?
The short answer is: Microsoft Graph is a REST API that can be used to interact with data in Microsoft 365. Microsoft Graph, also known as Graph API or Microsoft Graph API, can be used to access all sorts of data: users and groups, teams, tasks, files, mails, meetings and calendars and organizational charts. Graph API is most effective when automating tasks or combining various data from different applications. Its strength is that it can combine these different applications, for example both Outlook, OneDrive and Sharepoint, without having to use three separate APIs. Microsoft Graph is a single API to get all interaction data that is needed to perform tasks throughout the Microsoft 365 cloud.
There are endless examples of use cases to use Microsoft Graph to automate, build and develop. However, in this blog post, we will focus on getting data from Intune, as well as automating configurations for Intune. Microsoft Graph can be used with a variety of languages, including PowerShell. Since I am most comfortable with PowerShell, that’s the language we’ll be using in this blog post.
Video: Microsoft's introduction to Graph API
What do you need to get started with Microsoft Graph?
In order to use Microsoft Graph using PowerShell, you will need to have PowerShell and the Microsoft Graph PowerShell SDK installed. You should also have a Microsoft work or school account. If you want to manage Intune using Graph API, of course you’ll also need an Intune license.
How do you set up the Graph API?
App registration
It is recommended to create an App Registration before you get started with Graph API, in order to enable user authentication: to allow Microsoft Graph to read and write resources on behalf of a user. The easiest way of doing this, is by using Azure Active Directory admin center.
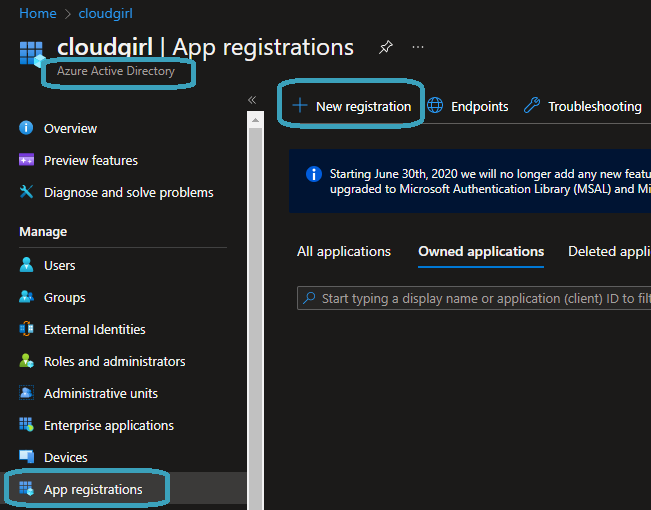
Navigate to Azure AD, click on App Registrations and click New Registration.
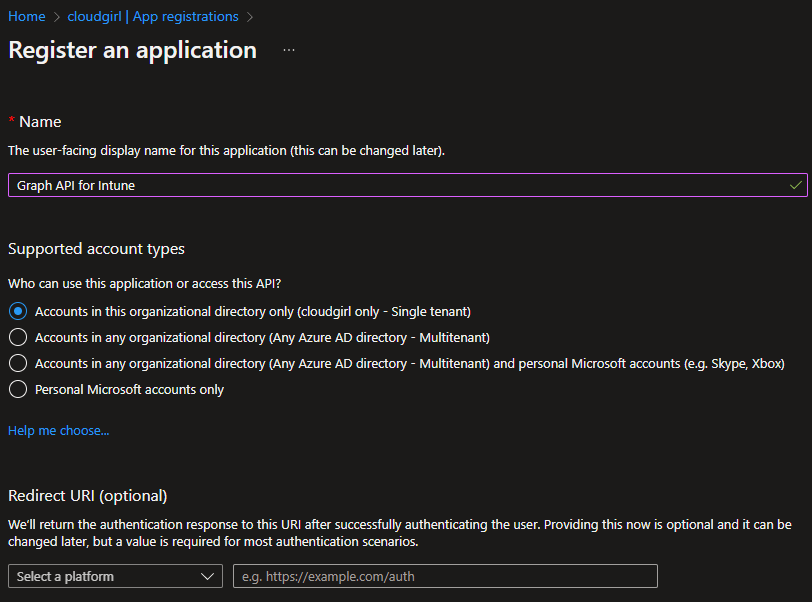
You will need to provide a name for your new app registration and you will have to choose who can use this application. Each of the options speak for themselves. For this demo, I will choose accounts in this organizational directory only. The redirect URI can be left empty.
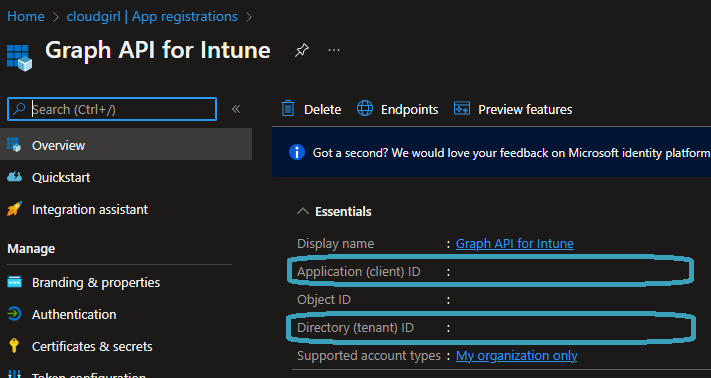
Once the application is registered, make sure you copy down the Application (client) ID and the Directory (tenant) ID from the Overview page.
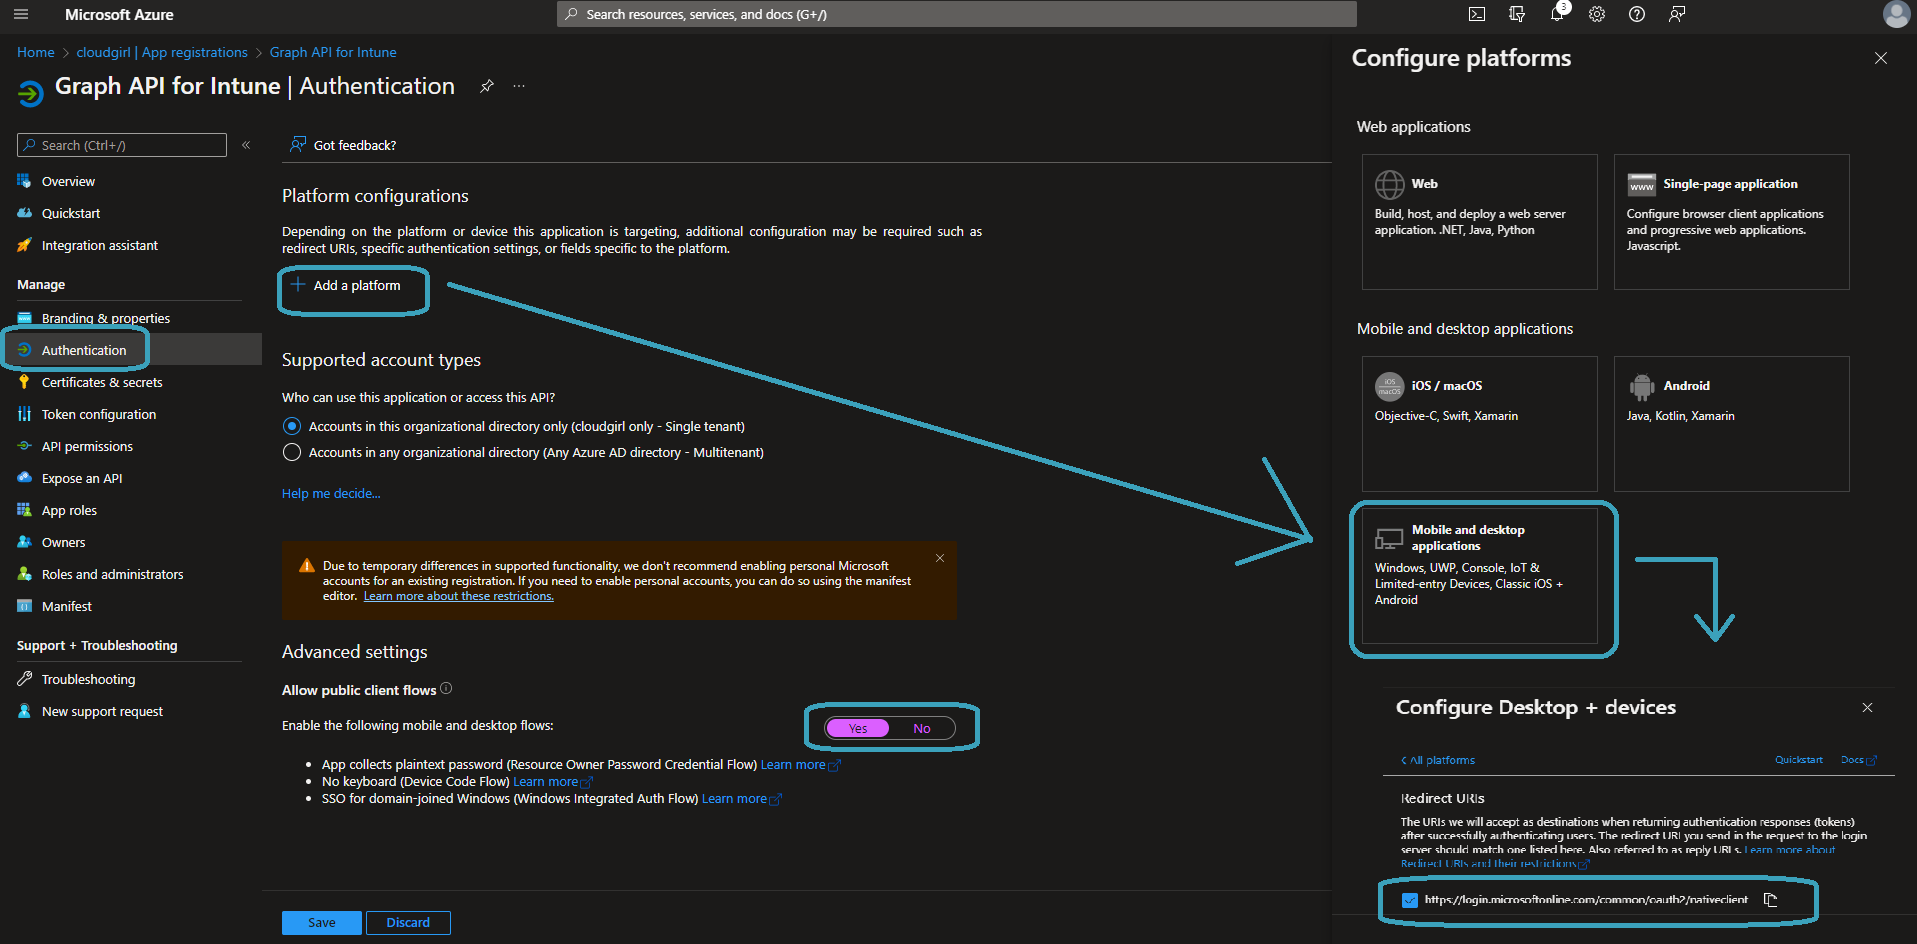
To be able to use the application, you’ll need to configure authentication. Navigate to the Authentication blade. Under Platform configurations, choose Add a platform, then choose Mobile and desktop applications. Make sure you tick the URL with login.microsoftonline.com. On the Authentication blade, make sure you also switch Enable the following mobile and desktop flows to yes. Hit the Save button.
Connect to Microsoft Graph using PowerShell
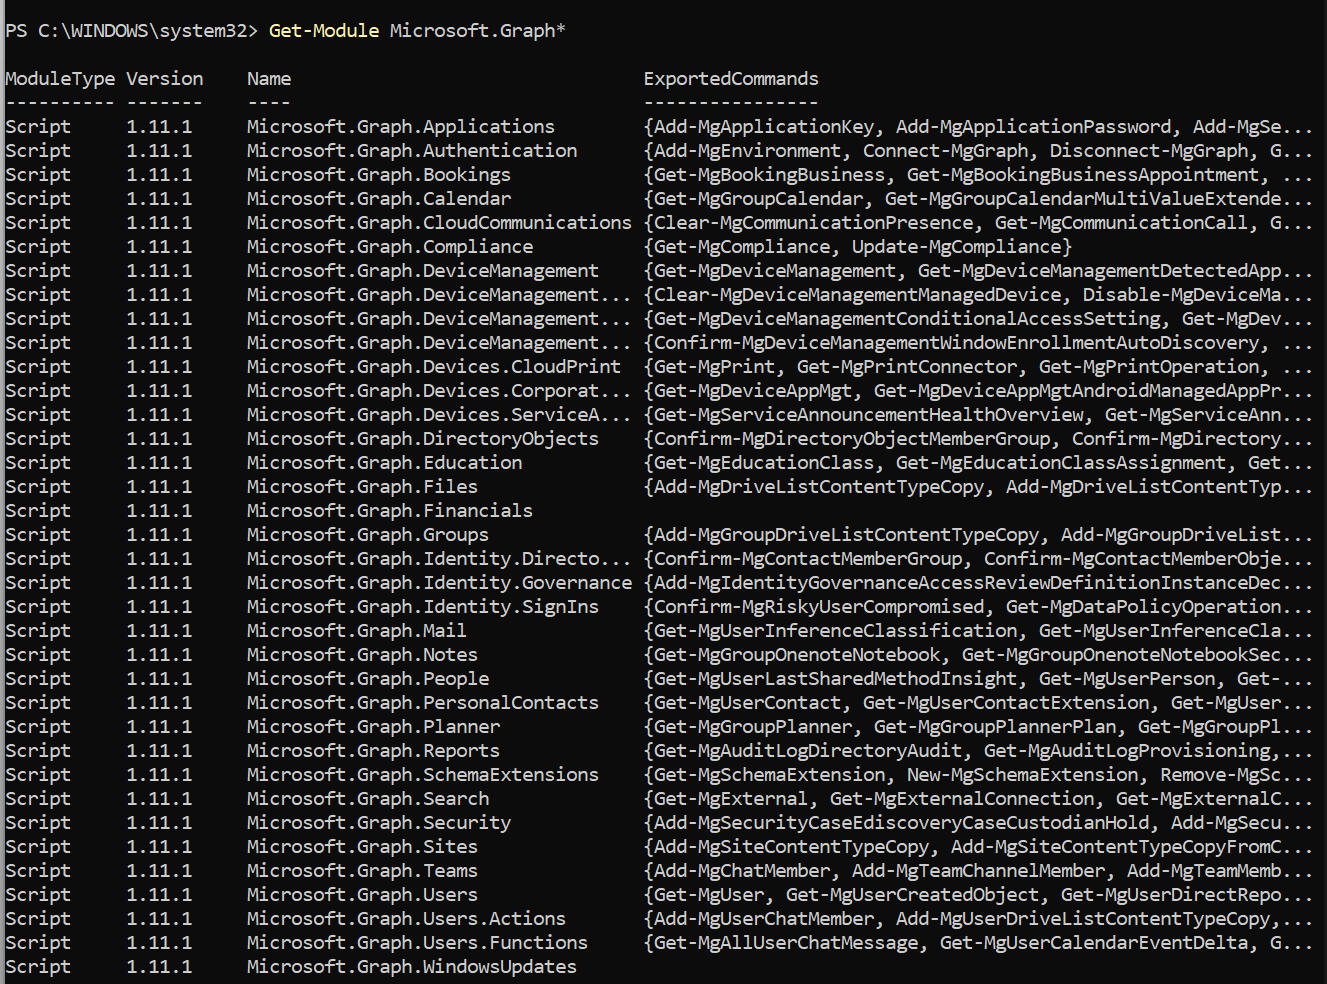
Your app registration is now complete and ready to be used. The next step will be to connect to the Graph API. From here on, we’ll move from the Azure AD portal to PowerShell. First, make sure you have the Microsoft Graph PowerShell SDK. Don’t have it yet? Run Install-Module Microsoft.Graph. You might have to import the module after installing it, using Import-Module Microsoft.Graph. You can check whether all modules are installed and loaded by running Get-Module Microsoft.Graph*. You should get a list of all modules, including Microsoft.Graph.Devicemanagement.
Once the module is installed, you can start connecting to your Graph API. First, add the client ID and tenant ID for your application, as you have copied in the previous step, to variables.
$clientID = “<client-ID>”
$tenantID= “<tenant-ID>”
In order to use Graph API with the right permissions, you’ll need to define the scopes. The permissions scopes required to manage Intune are defined and compared to the corresponding Microsoft Endpoint Manager terminology on this Microsoft page. We’ll add all these scopes to a single variable.
$scopes = "DeviceManagementManagedDevices.PrivilegedOperations.All, DeviceManagementManagedDevices.ReadWrite.All, DeviceManagementManagedDevices.Read.All, DeviceManagementRBAC.ReadWrite.All, DeviceManagementRBAC.Read.All, DeviceManagementApps.ReadWrite.All, DeviceManagementApps.Read.All, DeviceManagementConfiguration.ReadWrite.All, DeviceManagementConfiguration.Read.All, DeviceManagementServiceConfig.ReadWrite.All, DeviceManagementServiceConfig.Read.All, Device.Read.All"
Now connect to the Graph API using the follow line:
Connect-MgGraph -ClientId $clientId -TenantId $tenantID -Scopes $scopes
You should get a pop-up screen where you’ll be asked to log in using an account that has the right permissions. You’ll be asked to review permissions and consent on behalf of your organization. Once that’s done, you’ll see PowerShell welcoming you to Microsoft Graph!

Basic tasks using Microsoft Graph
Of course, this is the part where you’ll want to automate everything. By having succesfully connected to the Graph, there’s still a long learning path to go. Longer than I can describe in this post. Therefore, we’ll look at the following tasks:
- Find relevant cmdlets for Microsoft Graph and Intune
- Example: Review device information using Graph API
- Find sample scripts to be used with Graph API
- Example: Create JSON files to work with configuration and compliance through Graph API
Find relevant cmdlets for Microsoft Graph and Intune
There are tons of commands which concern devices. The best way to see them all, is by using Find-MgGraphCommand -Command *device*. This will list all commands having to do with devices. Get-Help is a powerful tool to look into each of these commands, see what they do and how they can be used. Of course, Microsoft also documents all of these cmdlets on this page.
Example: Review device information using Graph API
The easiest task is to list all managed devices in your Intune environment. This can be done using
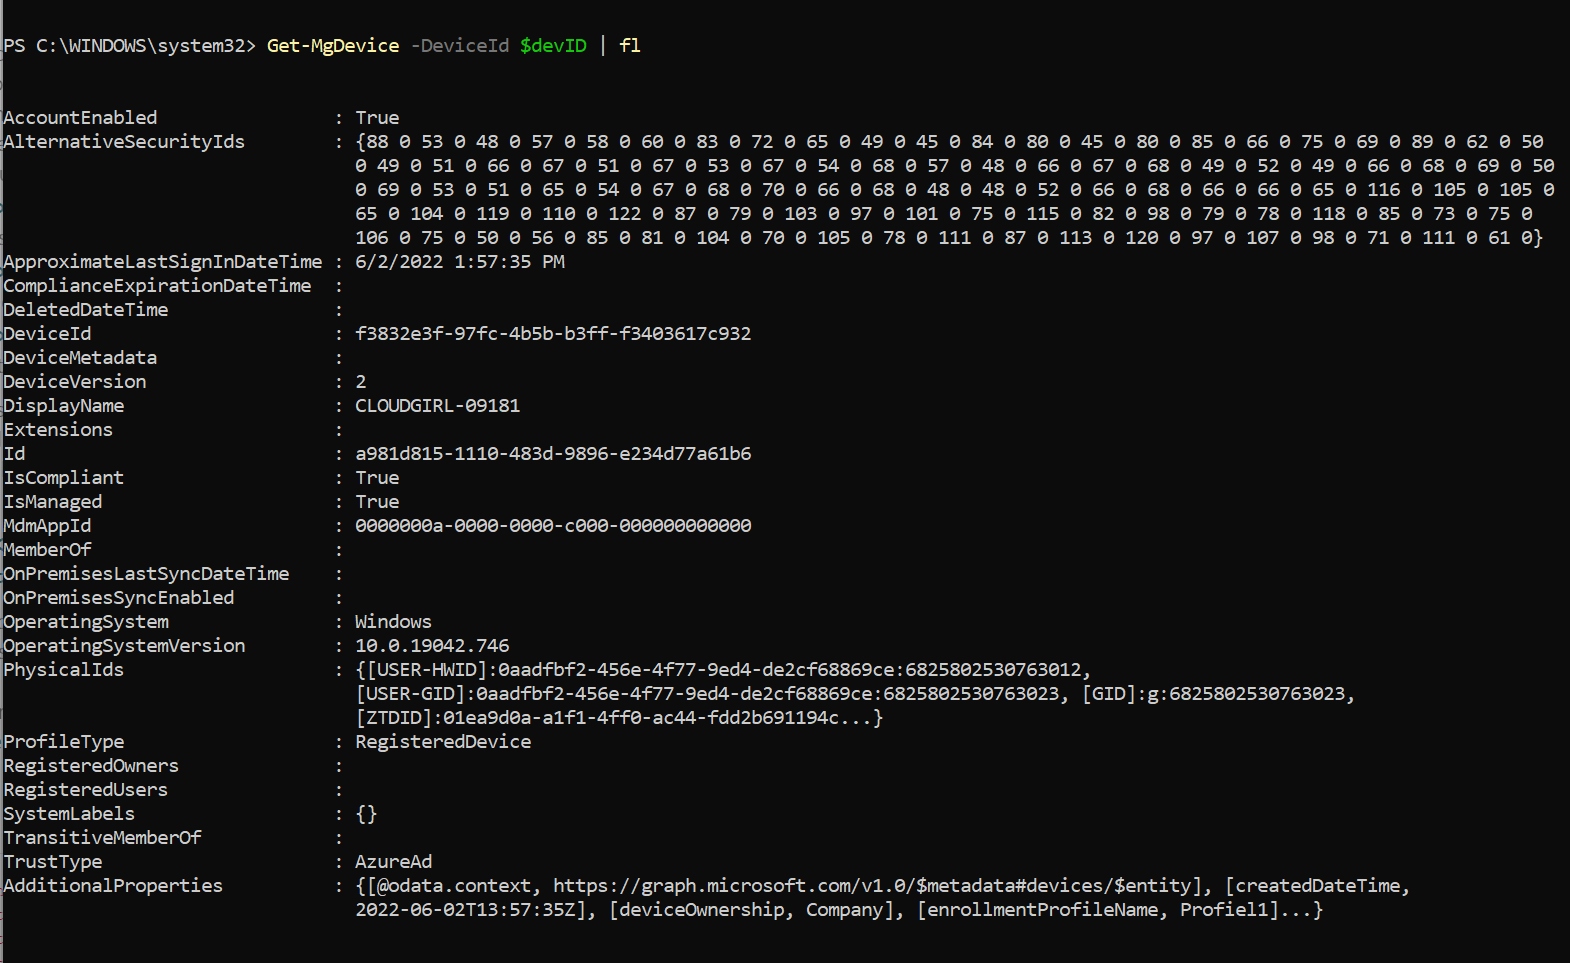
Get-MgDevice. The default format is not very helpful. For example: the display name will not be visible by default. This is where Select-Object comes in. You can choose one device from your table and use this to find a list with all properties, by running
Get-MgDevice -DeviceID <device ID> | fl.
This will give you a neat list of all properties of this device, so that you can review what information is given by the Graph.
For example, if I’d want the following information for all my devices:
- What is the display name?
- Is the device managed?
- Is it compliant?
- What is the operating system and what version is it running?
- Is the account enabled?
The follow command would work to get all this information in a neat table:
Get-MgDevice | Select-Object DisplayName, IsManaged, IsCompliant, OperatingSystem, OperatingSystemVersion, AccountEnabled | ft
Of course, any of the properties can be selected, according to your needs. The above example just shows you how to get the right information filtered out.
Find sample scripts to be used with Graph API
Microsoft Graph is not only to be used to just get information, it can also be used to actually manage your devices in an automated way. There are several sample scripts available to get this done, which can be found on this Microsoft Github page. Remember to never run a script, unless you know exactly what it does. Make sure you read the readme section and always test in a safe environment before running a script in production environments.
Since these scripts are very extensive, we will not look into these in this blog post. However, there is one important part in configuring devices and your Intune environment.
Example: Create JSON files to work with configuration through Graph API
Most of these scripts make use of a JSON file. The examples are neatly presented in each readme section, but this might not always suit your needs. It is useful to know the easy way of creating your own JSON file, designed to meet exactly your needs for configuration. We’ll look into one method of easily creating a complete JSON file, to be used with sample scripts or your own scripts.
The first step is to create your desired configuration in the portal. I have created a sample device restrictions policy for Windows. Using Microsoft Graph, you can export this policy to a JSON file.
First, run Get-MgDeviceManagementDeviceConfiguration to get an overview of your policies.

Make sure you copy the correct ID. Now run these cmdlets:
$configID = <Id>
$request = Get-MgDeviceManagementDeviceConfiguration -DeviceConfigurationId $configID
$request.AdditionalProperties | Convertto-Json | Out-File ./config.json
You will now have a neat JSON file that is almost ready to use. All you’ll need to add is the DisplayName and Description for your configuration, after which you can use it in any of the sample scripts.

Conclusion
In this blog post, you learned how to set up your environment to use Microsoft Graph for Intune and how to connect to this, using the right permissions for this purpose. You got a sneak peek into how to use Graph API to review and manage your devices and you learned how to find sample scripts, create JSON files and look into various cmdlets for device management with Microsoft Graph.
Will you get started on automating Intune deployments?

